Showing posts with label tutorial. Show all posts

A Tie Dyed Easter

I just came across this awesome DIY project on Pinterest and had to share. Silk dyed Easter eggs!

You wrap the eggs tightly in silk ties, boil them, and then -- magic happens -- when you unwrap them, they've taken on not only the colours of the tie, but also the pattern! Amazing. I mean, just look at that paisley.


Get all the details about how to make your own silk dyed eggs on Foxflat. She also has some links at the bottom of her post to other people's egg projects -- with various methods and strategies on how to tie up the eggs for the best results.

Read more...

4 Fabric Camera Strap DIY Tutorials

A cute fabric camera strap has long been on my List of Things I'd Like to Make. This week, I came across two new tutorials online that have reminded me of this project and maybe bumped it up a few notches on the list. No matter how many projects I do, this list just never gets shorter...

This is the classic strap one I'd been thinking of making...

Fabric Camera Strap - Tutorial by Make Something


This one has the added benefit of having a lens cap pocket. Clever!

Camera Strap Cover with Lens Cap Pocket- Tutorial by Little Big Girl Studio


This tutorial for a shorter strap caught my attention, as it's definitely how I prefer to hold my DLSR, usually with the long strap all curled up around my wrist a kazillion times...

Wristlet Camera Strap - Tutorial by Being Geek Chic


And last, but not least, this one is also awfully cute... Perhaps for fancy dress occasions?

Scarf Camera Strap - Tutorial by Photojojo


Read more...

Round Up of DIY Paper Flower Tutorials


My friend Monique got hitched this past summer up on the Sunshine Coast of British Columbia, in a beautiful setting that was both rustic and elegant. Monique, Rachael and I made tissue paper flowers for the archway where the ceremony took place. They turned out beautifully, and suited the gorgeous day (and the gorgeous bride!) perfectly. The photos above and below are from the wedding.


We looked up paper flower tutorials for weddings, and tried a variety of techniques, in the end drawing inspiration from several of them, as well as making up variations of our own. I thought I'd share the links to paper flower tutorials that we found, in case you are looking for paper flower tutorials for weddings, parties, or just to pretty up your surroundings or brighten your day.

Flowers using paper or card stock... 

  1. Rolled paper flowers tutorial by Jones Design Company
  2. Paper flower tutorial by A Little Hut 
  3. Paper poppies tutorial by It Happened Like This 
  4. Ranunculus flower tutorial by DIY or Don't 
  5. Vintage paper flower tutorial by Krista Sew Inspired
  6. Coffee filter roses tutorial by Martha Stewart


  1. Scalloped puffs, fringed flowers and spiral flowers tutorials from Scrapbooks Etc 
  2. Huge paper flower tutorial by Brittany on 100 Layer Cake (pictured above)
  3. Paper peonies tutorial by Martha Stewart
  4. Pop-up flowers tutorial by Pink Paper Peppermints
  5. Folded flower tutorial by  Whimsical World of Laura Bird
  6. Brown paper bag flowers tutorial by Bliss

Flowers using crepe paper or tissue paper...


  1. Paper flower wreath tutorial by Ruffled
  2. Four kinds of crepe paper flowers tutorials by Bliss 
  3. Crepe paper flowers galore: tulip, peony, lily, rose, spidermum, carnation, dahlia and daisy tutorials by Martha Stewart

Origami flowers...

  1. Carambola flowers tutorial by Go Origami
  2. Kusudama flowers tutorial by Folding Trees

Read more...

Small is Beautiful

I simply adore Elsa Mora's work. She makes magical little things with beads, felt, embroidery, papercuts and more. Her brooches are colourful and lovely... This one in particular caught my eye. Inspired by a vintage brooch she saw on Etsy, Elsa set out to recreate it using seed beads in place of jewels -- with beautiful results.

See more photos and explanation for this project on Elsa's blog.

Also definitely worth a look is her tutorial on making a brooch using a papercut and polymer clay. Using this technique, she crafted this super cute fox brooch. I'm looking foward to trying this out soon!


Read more...

Fabric Decals and All-Round Awesomeness

How cool is this kids room? I love those fabric cloud decals - based on a tutorial from How About Orange.


You can see more pics and read more about the project on Ohdeedoh.

Read more...

'Tis the Season (... Already!)

 I'm super excited to see my wreath made from recycled cardboard coffee sleeves included as one of the "8 Great DIY Wreaths" roundup on Apartment Therapy today!

The whole tutorial is here on Magpie and Cake and also over on Cut Out & Keep.

Read more...

A Dash of Cuteness

This felt flower brooch looks oh so happy and summery. The petal structure of dahlias really is goregeous.

Check out the tutorial on Holidash to make your own. Looks like a little patience is required. And some decent glue (to aid with the patience thing).

Read more...

Super Cute... in 20 Minutes or Less!

Molly at the Purl Bee posted a great a tutorial for a 20-minute tote bag. It looks super quick and super cute.

Best of all, her examples are made with the Spring 2010 Echino Ni-Co fabric collection. I am such a sucker for Echino fabric... I adore the pink glasses print, and the bus pattern is pretty darn sweet, too.

Read more...

DIY pom-pom necklace

So fabulous, and looks pretty easy. I love how these three colours look together.


Full tutorial here. [via]

Read more...

super simple coffee cardboard recycled wreath tutorial

It's Wreath Week over at Dollar Store Crafts! Great timing, as just a few days ago, in a burst of Christmas decorating, I made a wreath of my own... using the cardboard sleeves from disposable coffee cups.


I hate the waste of disposable coffee cups. But coffee is also an essential part of my morning commute, and sometimes I forget my stainless steel coffee thermos. I started to collect the coffee sleeves in a drawer of my desk at work - partly to remind myself how much waste builds up over the course of a year - and partly to reuse them at a later date in some craft project that I'd eventually dream up.

The variety of colours and textures that these things are made of is actually quite lovely. Like little swatches of cardboard.

I also have a bit of a history with cardboard coffee sleeves: a couple of years ago, I made a whole quilt out of coffee sleeves.

I didn't take any step-by-step photos while I was making the wreath, but it is super easy to make. Here's how...

Super Simple Coffee Cardboard Recycled Wreath Tutorial

You will need: old cardboard coffee sleeves (don't use new ones; just collect a few, or ask your friends to donate them from their eggnog lattes); a cereal box (ie a larger piece of cardboard for the backing); a glue gun (or strong glue + a bit more patience); scissors, a ribbon.

1. Plug in your glue gun!

2. Cut out a ring of cardboard from the back of an old cereal box. I used two bowls to outline the circles before cutting. You really don't need to be very precise though, as the circle will be totally covered when you're done.

3. Take your cardboard coffee sleeves, and cut out leaf shapes. You don't need a template for this either. Try to vary the sizes of the leaves, so you can tuck some little ones in among the larger leaves.

4. With your glue gun, put a dab of glue on a leaf, then stick it down onto the ring. You want to glue onto the "advertising" side of the cardboard (ie. where it says the name of the coffee shop), so the finished wreath is plain cardboard.

5. Repeat with all the leaves, gradually layering them. Vary the angles of the leaves to create an organic, branchy look. Also mix up the sizes, colours and textures of the leaves as you go.

6. Tie on a ribbon, and you're good to go!


Read more...

a very crafty advent calendar

Forget how many shopping days are left till Christmas. Personally, I'm keeping an eye on how many crafting days are left. This week I got two more Top Secret crafty gifts finished up (at last!) but still have plans for more... unless all those holiday parties get in the way.

If you're looking for fun ideas for holiday and Christmas crafts, check out Cut Out + Keep's online Advent Calendar for crafters. Every day till the big Two-Five, they are posting a new craft tutorial... and today's tutorial is mine!


Here's my tutorial on how to make a 3D Joke Tree Advent Calendar. It's great for the silly monkeys in your life. And it's also a good excuse to whip out some corny jokes, such as these gems...

  • Why are Christmas trees like bad knitters?
    They both drop their needles!

  • What do you get when you cross a snowman with a vampire?
    Frostbite!

  • What do snowmen eat for breakfast?
    Ice Krispies!

  • Where do polar bears vote?
    At the North Poll!

Ho! Ho! Ho!

Cut Out + Keep is an online community for crafty and creative people to make and share step-by-step tutorials. You can post your own tutorials, show off things you've made or have a shot at someone else's project.

Read more...

forget strappy sandals... strappy yoga mats are where it's at!


Yesterday evening I decided to try out this tutorial on how to make a yoga mat strap. It was pretty quick and easy to make - and the finished strap works really well.

The design is nice and simple, as it ends up as just one strip of fabric looped in on itself. By far, the best part of this sewing project comes right at the end: after you're finished sewing, you loop the ends in on one other - performing what seems to be a bit of logic-defying, möbius-strip style move. Whoa. (Followed by Om.)

Check out the tutorial over on Craft:.

Read more...

tuts for mums

Sew Mama's round-up of sewing projects for Mother's Day also includes some nice tutorials for general summertime fun: a quilted garden tote to help with your planting, a tote bag to bring to the farmers' market, and a picnic blanket - complete with "rock pockets" to keep the blanket from blowing away!

Read more...

shirt dress from a dress shirt

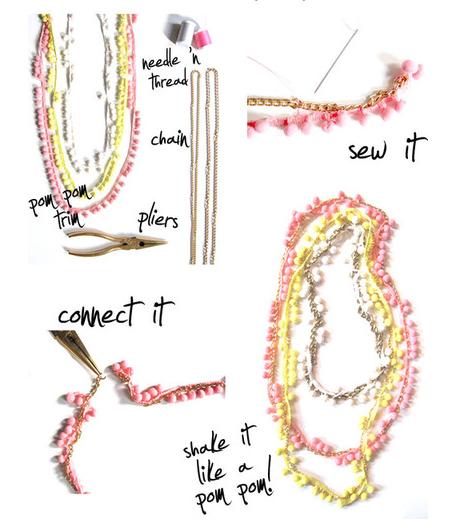
If I were a good enough seamstress to understand this photo set tutorial, this would be a lovely thing to make - a shirtdress from an old men's shirt. Antoinette at Clevergirl knows it, too:

"This tutorial will be most helpful if you have at least an advanced beginner's sewing skills and vocabulary. I won't teach how to sew here, I am just sharing how I make these shirts in case you'd like to try your hand at it."

Here's her Flickr set of all the tutorial images. If you've got the skills for it, it looks like you end up with a really lovely dress!

Read more...

owls make me want to be a better knitter

Every winter, I make a scarf or two. I only knit in straight lines; no increasing, decreasing, or any fancy stuff. I'm that kind of knitter.

But this pattern makes me want to be a better knitter: the owl sweater.


Oh my. That is quite possibly the cutest sweater ever. If those owls were mine, I would wear them ALL the time.

Needled has kindly written up and posted the pattern, so you (and I, once I learn to knit properly) can make your own owl sweater: the pattern PDF is here, and also read Needle's notes.

There's also a pattern for adorable knitted owl mittens, free from Kelbourne Woolens.

HOOT!

Read more...

more tutorials than you can handle

Looking for something to do? Looking for a kazillion things to do?

A couple of months ago, Whip Up went a bit crazy (in a good way) and posted HUGE LONG lists of links to online tutorials. You're sure to find something to keep you busy. If you missed it then (like I did), here are some links to those links...

Read more...

diy moo minicard holder... in 8 months and 5 minutes

This Moo minicard holder takes five minutes to make.

However, depending on how you look at it, it actually took me eight months and five minutes to make. I bought a pack of Moo minicards back in January, but hadn't got round to sewing this up until today.


This is so easy to make, I feel silly even writing up a tutorial - just take a paint swatch in your favourite colours, cut a shape out of one end (it helps to be able to pull the card out afterwards), then fold it in half and sew up the sides.

Turns out a paint swatch is the perfect size for Moo minicards. Which is nice, cause they're both list of "tiny pieces of paper I can't get enough of". Nicely printed greeting cards and cute notebooks are also on that list.


You could make up a few of these holders in various colours to keep different kinds of minicards in - greens for cards featuring your Etsy products, reds for your photos, blues for portraits... or if you're using them all for your craftwork, you could do yellows for jewellery, pinks for toys, oranges for clothing... Then, depending on who you're giving it to, you'd quickly know where to find the card that's is best-suited for them.

Read more...

great tip award (and some other great tips!)

Woop! Laurie at TipJunkie.com has awarded us one of her Great Tip Awards! Thanks, Laurie!

In her post about fun advent calendars she gave a shout out for my 3D Joke Tree Advent Calendar. (For the tutorial to make your own, click here.)

As per the rules of the Great Tip Award (and no, it's not "Don't talk about Great Tip Award"), I am supposed to link to three blogs with great tips.

This week (and always), I am into creativity and technology, so here are some tips along those lines:

1. Tips for selling your crafts...
Tips on how to be a good businesss owner from Emily at OrangeBeautiful, who recently guest-blogged on Design Sponge. Read part 1 and part 2 and part 3.

2. Tips for craft bloggers (or anyone with a computer who wants to get organized)...
These Are A Few Of My Favourite Tools (from the last Northern Voice blog conference), plus 100 Web Apps for Everything You Will Possibly Need (via So Misguided.) Bonus tip: DecentURL.com is one my latest fave web apps. Goodbye ugly and unintuitive URLs!

3. Tips for photographers (AKA: I just got my first DSLR and need to learn all the magical features!)...
How to master your DSLR camera, on LifeHacker.com.

Read more...

how to silkscreen (with a wolf)

The ever-fab Make blog has a great video tutorial on how to silkscreen - or screenprint, depending on what you prefer. It's hosted by two guys from Make Magazine and Etsy. (Wow, talk about a couple of jobs that I'd love to have.)

And cause they're both cool guys, they demonstrate the process by silkscreening a wolf. Rawr.

Watch the video tutorial here.

Also worth another look, Thimble.ca has a nice round-up of online silkscreening tutorials.

Read more...

TECHknitting

With some of the clearest, easiest to comprehend diagrams out there, the author of TECHknitting aims to take the twenty-five years of knitting experience out of her mind and put it into yours, one entry at a time.
I can't imagine all the time and effort that must go into each post. Every one is a gem, from technical how tos like the continental knit stitch to frustration-avoidance posts like how to make a sweater fit to theoretical question-and-answers such as why some stitches curl and others don't. The archives are also organized nicely - you can look things up alphabetically, chronologically, or by subject. I recommend the latter to start, as even though she's only been blogging for six months, TECHknitter has built up a substantial archive of resources. Brilliant knitting site.

Read more...
Related Posts with Thumbnails

visitor count

  © Blogger template Shush by Ourblogtemplates.com 2009

Back to TOP